This is the content of the pop-over!

Lightning Deal Alert – 12% Off Ends at Midnight!

Strike while the savings are hot! Use promo code FlashSale at checkout for 12% off any Exam Edge test or bundle. Hurry—the clock is ticking!

DOH Bone (DOH-BONE) Practice Tests & Test Prep by Exam Edge


DOH Bone practice tests

Pass the DOH Bone Densitometry exam with confidence

Realistic practice tests, detailed explanations, and instant access—built to help you feel ready on test day.

Trusted by serious test takers
Real exam simulationInstant, 24/7 accessDetailed explanations
Instant access  •  No software required  •  Study at your pace
Featured on
DOH Bone Densitometry Practice Test Realistic practice • Detailed explanations • Instant access
Choose your plan

Practice smarter. Walk in prepared.

Every plan includes realistic exam simulation, detailed explanations, and immediate online access.

DOH Bone Densitometry Online Practice Test Bundles

BEST VALUE
15 practice tests

$149.25

$599.25

SAVE $450

Only $9.95 per test!

  • 100% Pass Guarantee
  • 15 online practice tests
  • 75 questions per test
  • Bonus: 100 Flash Cards + Study Guide
  • Instant access
  • Detailed Explanations
  • Practice tests never expire
  • Timed, untimed, or study guide mode
MOST POPULAR
10 practice tests

$99.50

$399.50

SAVE $300

Only $9.95 per test!

  • 10 online practice tests
  • 75 questions per test
  • Bonus: 100 Flash Cards + Study Guide
  • Instant access
  • Detailed Explanations
  • Practice tests never expire
  • Timed, untimed, or study guide mode
5 practice tests

$69.75

$199.75

SAVE $130

Only $13.95 per test!

  • 5 online practice tests
  • 75 questions per test
  • Bonus: 100 Flash Cards
  • Instant access
  • Detailed Explanations
  • Practice tests never expire
  • Timed, untimed, or study guide mode
1 practice test

$39.95

  • 1 online practice test
  • 75 questions per test
  • Instant access
  • Detailed Explanations
  • Practice tests never expire
  • Timed, untimed, or study guide mode
Quick Select
Tap to choose a bundle

** All Prices are in US Dollars (USD) **


Everything you need

Exam resources

Clear answers and practical tools for every step of your exam journey.

DOH Bone (DOH-BONE) Resources

Jump to the section you need most.

Understanding the exact breakdown of the DOH Bone Densitometry test will help you know what to expect and how to most effectively prepare. The DOH Bone Densitometry has multiple-choice questions . The exam will be broken down into the sections below:

DOH Bone Densitometry Exam Blueprint
Domain Name
Osteoporosis and Bone Health  
Equipment Operation and Quality Control  
Patient Preparation and Safety  
DXA Scanning of Lumbar Spine  
DXA Scanning of Forearm  
DXA Scanning of Proximal Femur  

DOH Bone Densitometry Study Tips by Domain

  • Diagnose osteoporosis by T-score at the femoral neck, total hip, or lumbar spine: normal ≥ −1.0, osteopenia −1.0 to −2.5, osteoporosis ≤ −2.5; red flag: don’t use Ward’s area or lateral spine for diagnosis.
  • Use Z-scores (not T-scores) for premenopausal women, men <50, and children; practical cue: a Z-score ≤ −2.0 is “below the expected range for age” and should prompt evaluation for secondary causes.
  • Distinguish osteoporosis from osteomalacia—low BMD alone doesn’t confirm osteoporosis; common trap: untreated vitamin D deficiency can mimic fragility with low BMD but requires different management.
  • Identify major secondary causes to flag for referral: chronic glucocorticoids, hyperparathyroidism, hyperthyroidism, malabsorption/celiac, chronic kidney disease, hypogonadism; priority rule: long-term steroid use is a high-risk trigger even before T-score reaches −2.5.
  • Interpret fracture risk beyond BMD by combining clinical risk factors (e.g., prior fragility fracture, age, smoking, alcohol, rheumatoid arthritis) with tools like FRAX; red flag: FRAX may underestimate risk when multiple or recent fractures are present.
  • Know key bone-health interventions and contraindications: weight-bearing/resistance exercise, calcium/vitamin D adequacy, and fall-risk reduction; common trap: avoid advising high-dose calcium without considering nephrolithiasis risk and renal function.
  • Perform and document the manufacturer’s daily QC check (e.g., phantom scan) before patient exams; red flag: any value outside the facility’s established control limits means stop scanning and troubleshoot.
  • Use a control chart (e.g., Levey-Jennings) to track QC trends; common trap: ignoring a gradual drift that stays “in range” but shows a consistent shift over several days.
  • Verify correct patient and exam setup in the software (site, side, demographic data) before acquisition; red flag: wrong scan mode or incorrect patient data can invalidate T-scores and baseline comparisons.
  • Keep the table, detector, and calibration/phantom area clean and free of artifacts; common trap: dust, straps, clothing snaps, or positioning aids in the scan field causing spurious BMD changes.
  • Maintain consistent system configuration and log all service events (software updates, tube/detector service, relocation); priority rule: after major service or moves, repeat baseline QC and follow facility policy before resuming clinical scans.
  • Apply radiation safety and equipment interlock checks as required by policy; red flag: bypassed shields, warning lights, or door/interlock issues require immediate removal from service and reporting per DOH-aligned procedures.
  • Verify identity with two identifiers and confirm the ordered site(s) before scanning—red flag: mismatched order/patient or wrong laterality documented.
  • Screen for pregnancy in patients of childbearing potential and apply ALARA with shielding/positioning as appropriate—contraindication/hold: suspected or confirmed pregnancy unless explicitly authorized.
  • Assess recent contrast/nuclear medicine studies and delay DXA when indicated—common trap: barium/iodinated contrast or radionuclide uptake causing falsely elevated BMD.
  • Review intake of calcium supplements, antacids, and iron and instruct per facility policy (often hold for 24 hours)—red flag: tablets visible over the spine/hip region on the scout image.
  • Remove metal from the scan field (zippers, buttons, jewelry, belts, coins) and document any nonremovable hardware—common trap: clothing artifacts inflating BMD at L1–L4 or hip.
  • Position for comfort and immobility (supports, padding, clear breathing instructions) and stop if pain or unsafe transfers occur—priority rule: patient safety and fall prevention outweigh completing the scan.
  • Use PA lumbar spine L1–L4 as the default acquisition; red flag: exclude vertebrae with focal artifact or structural change (e.g., fracture, hardware) rather than forcing them into the analysis.
  • Positioning priority: hips and knees flexed to reduce lordosis and center the spine; common trap is pelvic rotation or scoliosis causing asymmetric pedicles and skewed BMD.
  • Scan field must include T12 ribs through the sacrum with full transverse processes visible; red flag is cropped L1 or L4, which can invalidate the region of interest for comparison.
  • Vertebra labeling must be anatomically consistent (identify T12 by ribs, count down); common trap is transitional anatomy (lumbarized S1 or sacralized L5) leading to wrong vertebra selection and wrong T-scores.
  • Analysis rule: use only contiguous, evaluable vertebrae and document exclusions; red flag when one vertebra differs markedly from adjacent levels (suggesting artifact) and should be removed per facility protocol.
  • For follow-up studies, match prior positioning, scan mode, and ROI placement as closely as possible; common trap is changing vertebra inclusion between visits, which can mimic a clinically significant change.
  • Select the forearm when hip/spine can’t be measured (e.g., bilateral hip replacements, severe spine artifact) and prioritize the 33% (one-third) radius as the standard cortical site—red flag: using ultradistal radius for diagnosis when the protocol calls for 33% radius.
  • Scan the non-dominant forearm unless contraindicated and avoid the arm with prior fracture, hardware, or AV fistula—common trap: scanning the dominant side without documenting why.
  • Position with the forearm flat, shoulder abducted, elbow flexed ~90°, and wrist in neutral with the radius and ulna parallel—red flag: rotation or flexion that separates/overlaps bones and degrades ROI placement.
  • Center the ROI to include the distal radius/ulna and ensure the 33% radius site is measured at the correct distance from the ulnar styloid per manufacturer protocol—common trap: inconsistent landmarking that makes serial comparisons invalid.
  • Review the image for artifacts (jewelry, watches, splints, contrast contamination) and repeat before analysis if present—priority rule: remove external objects rather than “editing them out” in software.
  • For follow-up scans, match the same side, positioning, and analysis mode and verify comparable scan length/ROI placement—red flag: changing side or ROI method without noting it, which can falsely suggest bone loss or gain.
  • Position the leg in 15–25° internal rotation with a foot immobilizer to align the femoral neck; red flag: inadequate internal rotation falsely lowers neck BMD by foreshortening.
  • Center and collimate to include the femoral head, neck, and at least 1–2 cm below the lesser trochanter; common trap: clipping the lesser trochanter or head makes the study non-diagnostic and may require repeat exposure.
  • Acquire and analyze the correct side per facility/DOH protocol and keep it consistent for follow-ups; priority rule: if prior exams exist, match the same hip and same regions of interest unless a documented contraindication exists.
  • Place ROIs correctly (total hip, femoral neck) and avoid including cortical shaft or ischium in the total hip box; red flag: ROI drift between exams inflates apparent change and can invalidate precision tracking.
  • Assess for artifacts and structural abnormalities (hardware, fracture, severe OA, focal sclerosis) before using hip values; contraindication cue: if hip is compromised, scan/interpret the opposite hip and document the reason.
  • Verify image quality and analysis with on-screen checks (neck axis through center, no rotation/abduction, proper edge detection); common trap: accepting auto-edge errors can shift BMD—always review and manually correct when borders cut into soft tissue or miss cortex.


Quick answers

Frequently asked questions

How closely do the practice tests match the real exam?

Our tests mirror the exam's structure, pacing, topic coverage, and question style so practice feels familiar on test day.

Are the questions different in each practice test?

Each test uses its own question set, giving you broader coverage as you work through a bundle.

Can I retake a test?

Yes. Retake your tests and use the score reports to focus your next study session.

Do I need to install software?

No. Your practice tests work online and are available from your account at any time.

Built to Fit Into Your Busy Life

Everything you need to prepare with confidence—without wasting a minute.

Three Study Modes

Timed, No Time Limit, or Explanation mode.

Actionable Analytics

Heatmaps and scaled scores highlight weak areas.

High-Yield Rationales

Concise explanations emphasize key concepts.

Realistic Interface

Matches the feel of the actual exam environment.

Accessible by Design

Clean layout reduces cognitive load.

Anytime, Anywhere

Web-based access 24/7 on any device.
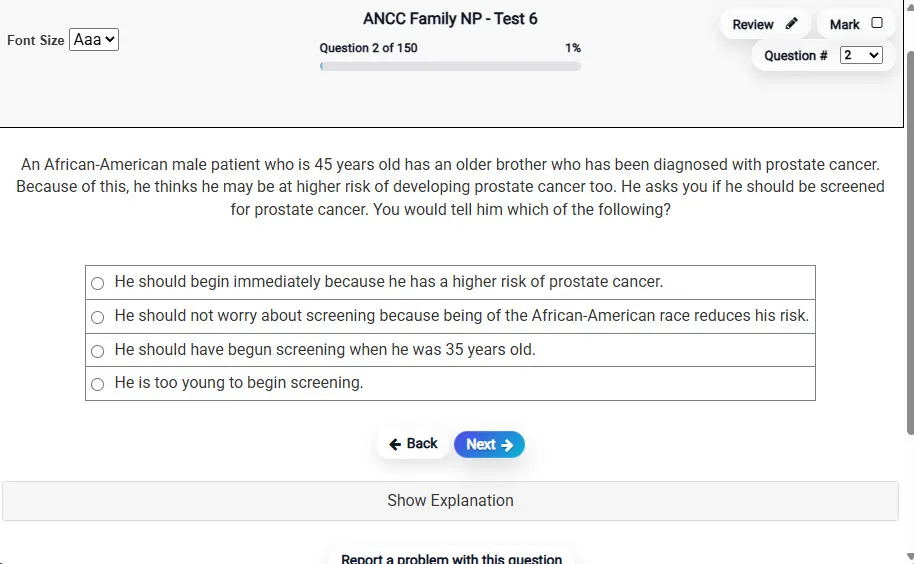
Answering a Question screen – Multiple-choice item view with navigation controls and progress tracker.
Answering a Question Multiple-choice item view with navigation controls and progress tracker.

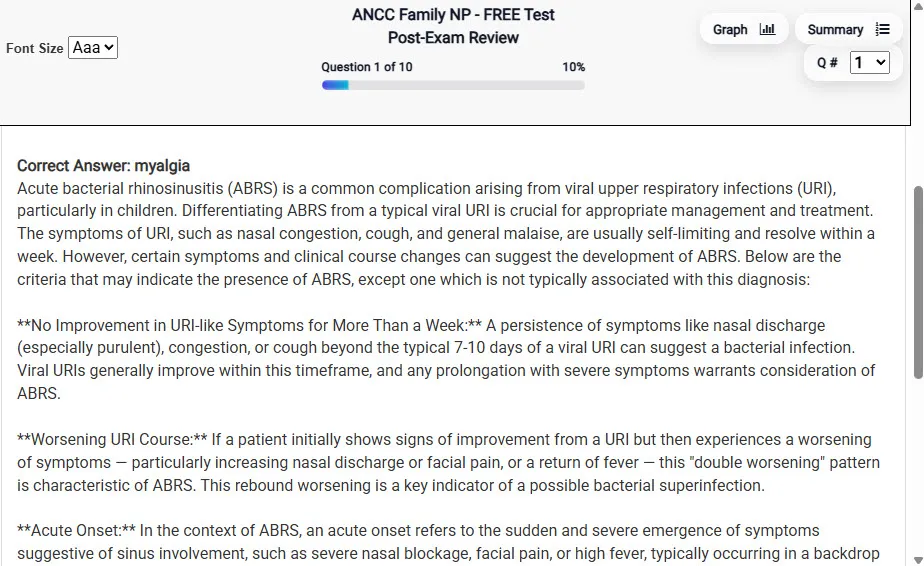
                           Detailed Explanation screen – 
                         Review mode showing chosen answer and rationale and references.
Detailed Explanation Review mode showing chosen answer and rationale and references.

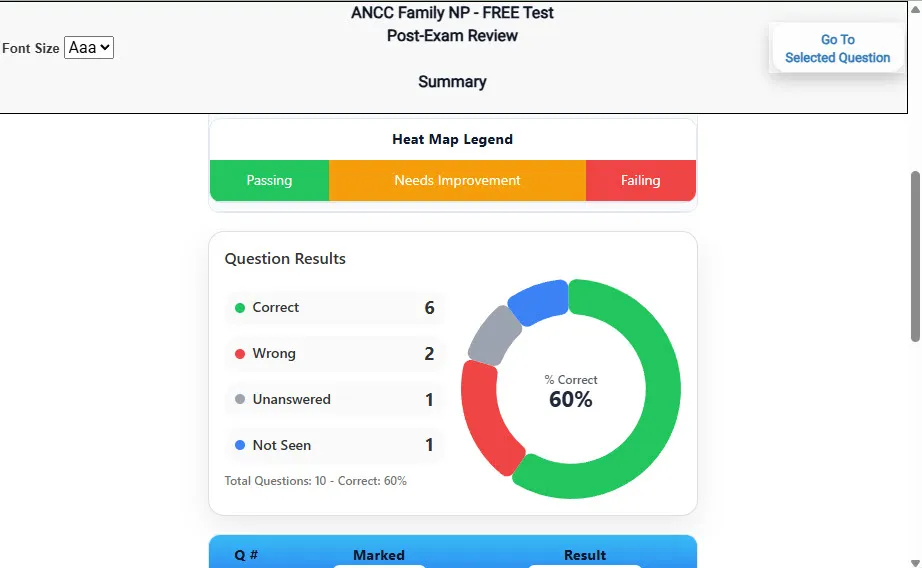
                           Review Summary 1 screen – 
                         Summary with counts for correct/wrong/unanswered and not seen items.
Review Summary 1 Summary with counts for correct/wrong/unanswered and not seen items.

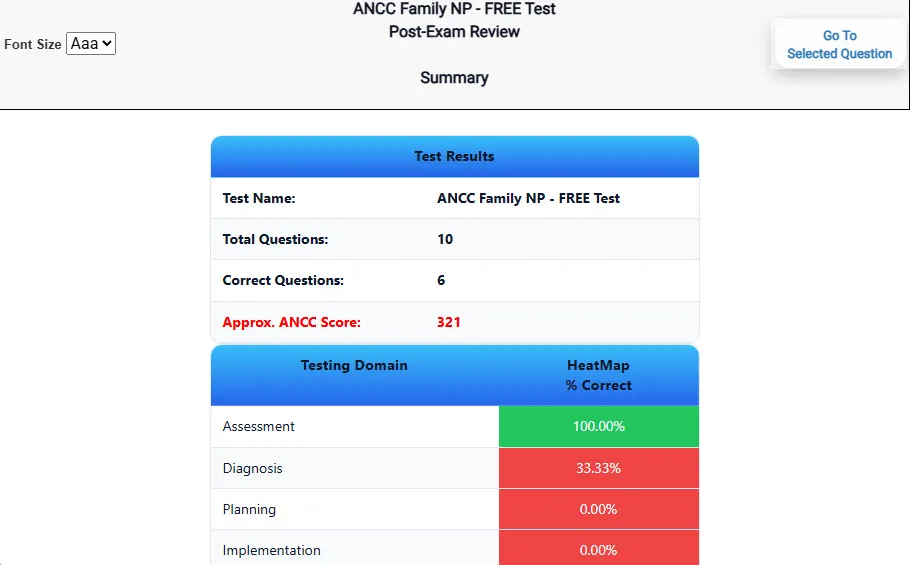
                           Review Summary 2 screen – 
                         Advanced summary with category/domain breakdown and performance insights.
Review Summary 2 Advanced summary with category/domain breakdown and performance insights.

What Each Screen Shows

Answer Question Screen

  • Clean multiple-choice interface with progress bar.
  • Mark for review feature.
  • Matches real test pacing.

Detailed Explanation

  • Correct answer plus rationale.
  • Key concepts and guidelines highlighted.
  • Move between questions to fill knowledge gaps.

Review Summary 1

  • Overall results with total questions and scaled score.
  • Domain heatmap shows strengths and weaknesses.
  • Quick visual feedback on study priorities.

Review Summary 2

  • Chart of correct, wrong, unanswered, not seen.
  • Color-coded results for easy review.
  • Links back to missed items.

Top 10 Reasons to Use Exam Edge for your DOH Bone Densitometry Exam Prep

  1. Focused on the DOH Bone Densitometry Exam

    Our practice tests are built specifically for the DOH Bone exam — every question mirrors the real topics, format, and difficulty so you're studying exactly what matters.

  2. Real Exam Simulation

    We match the per-question time limits and pressure of the actual DOH exam, so test day feels familiar and stress-free.

  3. 15 Full Practice Tests & 1,125 Unique Questions

    You'll have more than enough material to master every DOH Bone concept — no repeats, no fluff.

  4. Lower Cost Than a Retake

    Ordering 5 practice exams costs less than retaking the DOH Bone Densitometry exam after a failure. One low fee could save you both time and money.

  5. Flexible Testing

    Need to step away mid-exam? Pick up right where you left off — with your remaining time intact.

  6. Instant Scoring & Feedback

    See your raw score and an estimated DOH Bone Densitometry score immediately after finishing each practice test.

  7. Detailed Explanations for Every Question

    Review correct and incorrect answers with clear, step-by-step explanations so you truly understand each topic.

  8. Trusted & Accredited

    We're fully accredited by the Better Business Bureau and uphold the highest standards of trust and transparency.

  9. Web-Based & Always Available

    No software to install. Access your DOH Bone practice exams 24/7 from any computer or mobile device.

  10. Expert Support When You Need It

    Need extra help? Our specialized tutors are highly qualified and ready to support your DOH exam prep.


Pass the DOH Bone Densitometry Exam with Realistic Practice Tests from Exam Edge

Preparing for your upcoming DOH Bone Densitometry (DOH-BONE) Certification Exam can feel overwhelming — but the right practice makes all the difference. Exam Edge gives you the tools, structure, and confidence to pass on your first try. Our online practice exams are built to match the real DOH Bone exam in content, format, and difficulty.

  • 📝 15 DOH Bone Densitometry Practice Tests: Access 15 full-length exams with 75 questions each, covering every major DOH Bone Densitometry topic in depth.
  • Instant Online Access: Start practicing right away — no software, no waiting.
  • 🧠 Step-by-Step Explanations: Understand the reasoning behind every correct answer so you can master DOH Bone exam concepts.
  • 🔄 Retake Each Exam Up to 4 Times: Build knowledge through repetition and track your improvement over time.
  • 🌐 Web-Based & Available 24/7: Study anywhere, anytime, on any device.
  • 🧘 Boost Your Test-Day Confidence: Familiarity with the DOH format reduces anxiety and helps you perform under pressure.

These DOH Bone Densitometry practice exams are designed to simulate the real testing experience by matching question types, timing, and difficulty level. This approach helps you get comfortable not just with the exam content, but also with the testing environment, so you walk into your exam day focused and confident.


Exam Edge DOH Reviews


I am glad to inform you that I have successfully passed my HAAD ophthalmology exams, your mock tests were extremely helpful in my journey to this success, thank you once again

Farheen, Karnataka India

I took the exam and failed because I didn't review well and didn't know which topics to focus on, but after purchasing these 20 sets from haadrn.Com, I passed my second exam. I only finished up to 17 sets, I am thankful for this site because I can review online anytime, anywhere! Friends are asking ...
Read More
parrenas, Philippines

Thank you Exam Edge :) I passed the Haad RN exam :) Godbless :)

Fedi, Manila, Philippines

I just want to take this opportunity to thank Exam Edge since I passed my HAAD exam.

RHODALYN,


DOH Bone Densitometry Exam Aliases

Here is a list of alternative names used for this exam.

  • DOH Bone Densitometry
  • DOH Bone Densitometry test
  • DOH Bone Densitometry Certification Test
  • DOH Bone test
  • DOH
  • DOH DOH-BONE
  • DOH-BONE test
  • DOH Bone Densitometry (DOH-BONE)
  • Bone Densitometry certification